
Safe lock help · Sentry Safe
Safe lock troubleshooting › Sentry Safe › Sentry fire and water safe with fingerprint scanner (SFW123B, SFW205B)
The SentrySafe fingerprint fire and water safes (the SFW123B and SFW205B series) have a round keypad with a fingerprint scanner at the top of it, and a key lock below the handle. You can open them with a 5-digit code or a programmed finger. This guide covers how to open the safe, add and delete codes and fingerprints, replace the 4 AAA batteries, and what the lights mean.
Want the whole manual? Jump to the manufacturer download links.
Is this your lock?
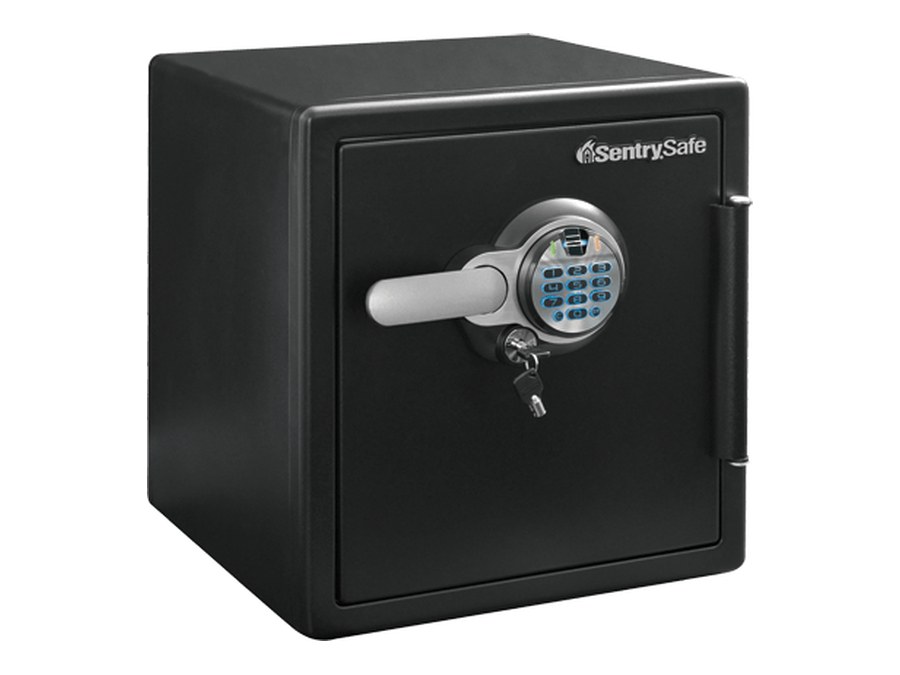
- A SentrySafe fire and water safe with a round keypad (numbers, a P key and a C key) and a fingerprint scanner at the top of the keypad. A green light turns blue while you program.
- Model numbers are SFW123BSC, SFW123BTC, SFW205BWC and SFW205BXC. Sentry’s manual for them is part number P65793.
- It has the factory code (on the back of the owner’s manual), two 5-digit user codes (one primary and one secondary) and fingerprints: two primary fingerprints and eight secondary ones.
- A dual key lock is included. The key can disable and enable entry. It is not an override key, and it must be in the horizontal position to open the safe.
How to open it
- With a finger: place a programmed finger on the sensor. A green light and one beep show the finger was read.
- With the code: enter your 5-digit code on the keypad. A green light shows the code is right.
- Turn the handle downward to open the door.
- If you push on the handle too hard, you may hear a click and the handle moves without moving the bolts. That is normal. Lift the handle the other way until it clicks back, and try again.
- You may have to hold the handle up while you enter the code, and then pull it down.
- If the keypad sound is turned off, it is harder to use the scanner, because a single beep shows your finger was read.
- Delay mode: after 3 wrong entries in a row, the red LED blinks and the safe shuts down for 2 minutes. Do not take the batteries out to restart it.
How to change the battery
The safe uses 4 AAA alkaline batteries (we recommend Procell) in a drawer on the side of the keypad. Do not use rechargeable batteries or any other non-alkaline type, and do not mix old and new, or alkaline and other types. The yellow light means the battery is low.
- Slide out the battery drawer on the side of the keypad.
- Put in 4 AAA alkaline batteries.
- Slide the drawer back into the keypad until it clicks into place.
- Test the safe with the door open.
How to add codes and fingerprints
Do this with the safe door OPEN.
You need the factory code (on the back of your owner’s manual) to add or delete the primary code and the primary fingerprints, and the primary code to add or delete the secondary ones. Test every code and finger before you close the door.
Add or delete a primary user code (one allowed)
- Press P.
- Enter the 5-digit factory code. The green light flashes blue and then back to green: the safe is in program mode.
- Press your own 5-digit primary code.
- To delete it: press P, enter the factory code, and press 00000. The lock does not say it was deleted, so test it.
Add or delete a secondary user code (one allowed)
- Press P two times.
- Enter the primary code.
- Press a 5-digit secondary code.
- To delete it: press P twice, enter the primary code, and press 00000.
Add a primary fingerprint (two allowed)
- Press P and enter the factory code.
- Put a finger on the sensor. When the light turns green and it beeps once, take the finger off.
- When the light turns blue, put the same finger back. The light turns green and beeps once for each good scan.
- Repeat until the sensor beeps twice (usually 5 to 10 good scans). That finger is saved.
- Do it again to add the second primary finger.
Add a secondary fingerprint (eight allowed)
- Press P two times and enter the primary code.
- The blue light blinks: the sensor is ready.
- Scan the finger as above, 5 to 10 times, until it beeps twice.
- Repeat for each extra finger.
Delete fingerprints
- Primary: press P, enter the factory code, put any finger on the sensor, and press C.
- Secondary: press P twice, enter the primary code, put any finger on the sensor, and press C.
- This deletes both fingerprints of that user. The lock does not say it was deleted, so test it.
- Each user can program two fingerprints. To add or delete a secondary user’s fingerprint, a primary user code must already be set.
- Tips for the scanner: do not pick a finger with a cut or scar. Keep your hands clean and dry. Clean the sensor with a dry, lint-free cloth. The sensor may not work well when it is cold.
- Keypad sound: press 0, P, 0 to turn it off, and 0, P, 1 to turn it on.
- Interior light: press 0, P and then 2 (off), 3 (30 seconds) or 4 (60 seconds).
What the lights mean
| What you see and hear | What it means and what to do |
|---|---|
| Green light and one beep (finger) | The finger was read. |
| Green light flashes blue then back to green | The safe is in program mode. |
| Red light blinks 3 times, 3 beeps | A wrong code, or low batteries. Check the code and enter it again (if your own code will not work, use the factory code). Replace the batteries if needed. |
| Red light blinks 5 times, 5 beeps | Keypad communication error. Call Sentry customer care, or call us. |
| Red light blinks once, 1 beep | The P key was pressed out of order, or the sensor could not read the finger. Repeat the steps. |
| Red light blinks continuously | Lockout (delay) mode. Wait 2 minutes and try again. |
| Yellow light on | The batteries are low. Replace them. |
Wrong entries
Three wrong entries in a row put the safe in delay mode: the red LED blinks and the safe shuts down for 2 minutes. Wait the 2 minutes. Taking the batteries out only makes the wait longer.
If it still won’t open
The fingerprint will not unlock the safe
Clean and dry your finger and the sensor, place the same finger the same way as when you enrolled it, and see the scanner tips above. You can always use the keypad code.
I cannot enroll a finger
Choose a finger without a cut or scar, keep the hands clean and dry, and follow the steps above. The sensor may not work well when it is cold.
The code is right but the door will not open
Hold the handle up while you enter the code and then pull it down. If your safe has a key lock, make sure the key is in the unlocked (horizontal) position. Replace the batteries. A water-resistant door can be tight at first.
I lost the factory code
SentrySafe can look it up from your model and serial number on its Lost Key or Combo page. Call us if you need the safe opened.
Download the full manufacturer instructions
This page is a quick-reference summary. For every feature and diagram, use the official manual for your model:
- SentrySafe Water/Fire-Resistant Digital Safe with Fingerprint Scanner owner’s manual P65793Sentry’s manual for the SFW123B and SFW205B. Linked from SentrySafe.com’s Product Manuals page.
- SentrySafe Product Manuals (find your model)Type in your model number to get your own manual.
- SentrySafe Lost Key or ComboOrder a replacement key or request your factory code.
Need a hand?
Still stuck? We can help.
Having a hard time getting into your safe? Our technicians are trained to open malfunctioning safes professionally, so your valuables can still be safely secured. Call us or stop by.
Steve’s Lock, Safe and Alarm · 3401 N. Sepulveda Blvd, Manhattan Beach, CA 90266
More lock guides
About this guide. This is an independent guide from Steve’s Lock, Safe and Alarm, a safe and lock dealer. Brand and model names belong to their owners and are used only to help you identify your lock. We are not affiliated with the manufacturers. These steps summarize the manufacturers’ own instructions; your lock may be a different version, so if anything here does not match what your lock does, follow your manual or call us. Always change codes with the safe door open, and test the new code several times before you close the door.
Steps last checked against the manufacturer documents on October 19, 2026.