
Safe lock help · AMSEC
Safe lock troubleshooting › AMSEC › ESL10 / ESL10XL
The AMSEC ESL10 and ESL10XL are round electronic keypad locks with a C key and a # key. This guide covers how to open the safe, change the two 9-volt batteries, change the combination, and what the beeps and lights mean.
Want the whole manual? Jump to the manufacturer download links.
Is this your lock?
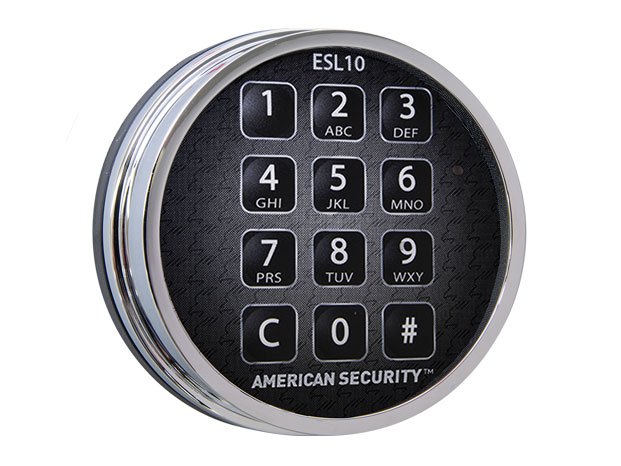
- A round electronic keypad on the door with keys C, 1 through 9, 0 and #, and a red light that flashes with each key.
- It uses a fixed 6-digit combination and two 9-volt batteries behind the keypad.
- The ESL10XL is the current version. The original ESL10 works the same way, with differences noted below.
- Compare the key layout to the photos above. The steps are the same for both versions unless a heading says otherwise.
How to open it
- Make sure the safe handle is centered in the locked position so the lock can open freely.
- Press C.
- Key in your 6-digit combination.
- Press #.
- If the combination was right, the lock opens for 3 seconds. Turn the handle to the unlocked position and pull the door open during that time.
- Made a mistake? Press C to clear the entry and start over. If you press no key for 10 seconds, the lock goes back to rest.
- If you press more than six digits, the lock uses the first five and the last one you press. This lets you hide your code from onlookers.
- Use only your fingers. Sharp objects damage the keypad and are not covered by the warranty.
How to change the battery
The ESL10 and ESL10XL use two 9-volt alkaline batteries. AMSEC recommends fresh, name-brand alkaline batteries, replaced once a year to prevent corrosion from leakage. We recommend Procell. Because the lock needs a quick burst of power, weak batteries are the number one cause of opening problems.
ESL10XL
- Grip the keypad and rotate it about 1/8 turn counter-clockwise to release it from the base.
- Carefully pull the keypad away from the base. Do not let it hang from the cable that connects it to the lock inside the safe.
- Lift the two 9-volt batteries out of their pockets.
- Carefully remove the battery clip from the end of each battery. Do not pull on the wires or disconnect the clip from the circuit board.
- Snap on two new 9-volt batteries. Make sure the clips are tight, with no loose contact.
- Press the batteries back into their pockets, routing the wires so they are not pinched under the batteries.
- Put the keypad back on the base, starting at the top (around the 11 o’clock position). Press down so the three tabs go into their slots, then rotate clockwise until it is level. It snaps into place.
Original ESL10
- Turn the keypad housing counter-clockwise to the stop and pull it away from the base.
- Unsnap the old batteries and clip on the new ones.
- Position the batteries in the pocket at the bottom of the housing and put the keypad back, making sure the wires are not pinched.
- The ESL10XL has no low-battery warning. AMSEC says a weak battery shows up as a keypad that does not respond, or no clicking sound from the bolt after you enter the code. A keypad that flashes slowly and takes no input is another sign.
- Do the change with the safe door open and test your combination afterward.
Why good-looking batteries can still fail
The lock uses a solenoid that needs a lot of current very quickly. A battery can seem to have charge and still be unable to deliver it. If the safe is acting up, replace both batteries with fresh name-brand alkaline ones.
How to change the code
Do this with the safe door OPEN.
Changing the combination with the door closed risks locking yourself out. Test the new code several times before you close the door.
Enter the old combination once and the new one twice. These are the ESL10XL steps; the original ESL10 uses the same routine.
- Press C.
- Press #. You hear a short warbling tone and the red light flashes.
- Key in your old 6-digit combination.
- Press #. A short good-combination tone means it was accepted.
- Key in your new 6-digit combination.
- Press #. Another short good tone.
- Key in the new combination again.
- Press #. If it matches the first entry, a long good-combination tone means the new combination is recorded.
- Test it several times before closing and locking the safe.
- Press C to clear a mistake at any point. After 10 seconds without a key press the lock returns to rest and keeps the old combination.
- On the original ESL10, a wrong old combination gives 4 short beeps, stops the change, and counts toward lockout.
- Change the factory combination as soon as the safe is installed.
What the beeps and lights mean
A warble is a high-low-high-low run of tones. These tables are for the ESL10XL.
| What you hear / see | What it means |
|---|---|
| 1 beep and 1 red flash | Normal: a key press was accepted. Also signals the end of a lockout. |
| 2 beeps | The lock is open after a correct code. |
| 4 beeps (light flashes 4 times) | An incorrect code was entered. After four wrong attempts the lock starts a 15-minute lockout. |
| 6 beeps | The lock is in penalty lockout and will not accept input. Wait for it to end. |
| Short warble (about 2.5 seconds) | An entry was accepted during a combination change. |
| Long warble (about 10 seconds) | The combination change is complete. |
| Red light flashes once every 5 seconds | Penalty lockout is in progress. |
| Rapid flashing and 8 chirps after a key press | You pressed a key during penalty lockout. |
| Red light solid for 3 seconds | The lock is activated after a successful code. The light also stays on with any beep and with each warble tone. |
Wrong-code lockout
After 4 incorrect combinations the lock goes into a 15-minute penalty lockout. The red light flashes once every 5 seconds and the keypad accepts nothing. On the ESL10XL, removing power does not reset the lockout, so pulling the batteries will not help. Wait it out.
If it still won’t open
Weak or dead batteries
This is the most common problem. Symptoms: the keypad does not respond, or you do not hear the bolt click after you enter the code.
Replace both batteries with fresh name-brand alkaline 9-volts. If it still does not respond, press C first, check that the cable is firmly seated in the keypad socket, and make sure the battery clips are tight on the battery posts.
Bolt binding: the lock clicks but the bolt will not retract
Pressure from the safe’s boltwork on the lock’s bolt can stop the lock from opening. Find a handle position that takes the pressure off:
- If the handle turns clockwise to open, turn it all the way counter-clockwise before you enter the code.
- If it turns counter-clockwise to open, turn it all the way clockwise first.
- Not sure which way? Move the handle to both stops and set it in the middle of that range.
The keypad only responds to C, or to C and one number
Rotate the keypad counter-clockwise and lift it off the base. Unplug the lock cable and plug it back in firmly. If that does not fix it, call us.
It only works for a while after each new battery
That points to bolt binding in the boltwork: fresh batteries just overpower it for a while. This needs a service visit. Call us.
Download the full manufacturer instructions
This page is a quick-reference summary. For every feature and diagram, use the official manual for your model:
- AMSEC support: ESL 10 lock articles (battery, combination, beeps, LED)American Security (AMSEC) knowledge base. Each article has a Download PDF button.
- AMSEC ESL10XL Operating Instructions (PDF)Revision A, released August 8, 2018. Hosted by AMSEC.
- AMSEC ESL10 Operating Instructions (PDF)Part No. 4305119, Rev B, May 28, 1998. Copy hosted by a supplier.
Need a hand?
Still stuck? We can help.
Having a hard time getting into your safe? Our technicians are trained to open malfunctioning safes professionally, so your valuables can still be safely secured. Call us or stop by.
Steve’s Lock, Safe and Alarm · 3401 N. Sepulveda Blvd, Manhattan Beach, CA 90266
More lock guides
About this guide. This is an independent guide from Steve’s Lock, Safe and Alarm, a safe and lock dealer. Brand and model names belong to their owners and are used only to help you identify your lock. We are not affiliated with the manufacturers. These steps summarize the manufacturers’ own instructions; your lock may be a different version, so if anything here does not match what your lock does, follow your manual or call us. Always change codes with the safe door open, and test the new code several times before you close the door.
Steps last checked against the manufacturer documents on October 14, 2026.