
Safe lock help · Sentry Safe
Safe lock troubleshooting › Sentry Safe › Older Sentry fire safe with the LCD fingerprint lock (“SKAN FINGER”)
Some older SentrySafe fire safes (the same family as the A3xxx to A5xxx and 12xx to 15xx models) have an LCD fingerprint lock: a small display that reads “SKAN FINGER,” a fingerprint sensor, a keypad with CLEAR and ENTER keys, and a key lock. It stores one manager and up to six users. This guide covers how to open it, enroll and delete users, the batteries, and the cold-weather limit.
Want the whole manual? Jump to the manufacturer download links.
Is this your lock?
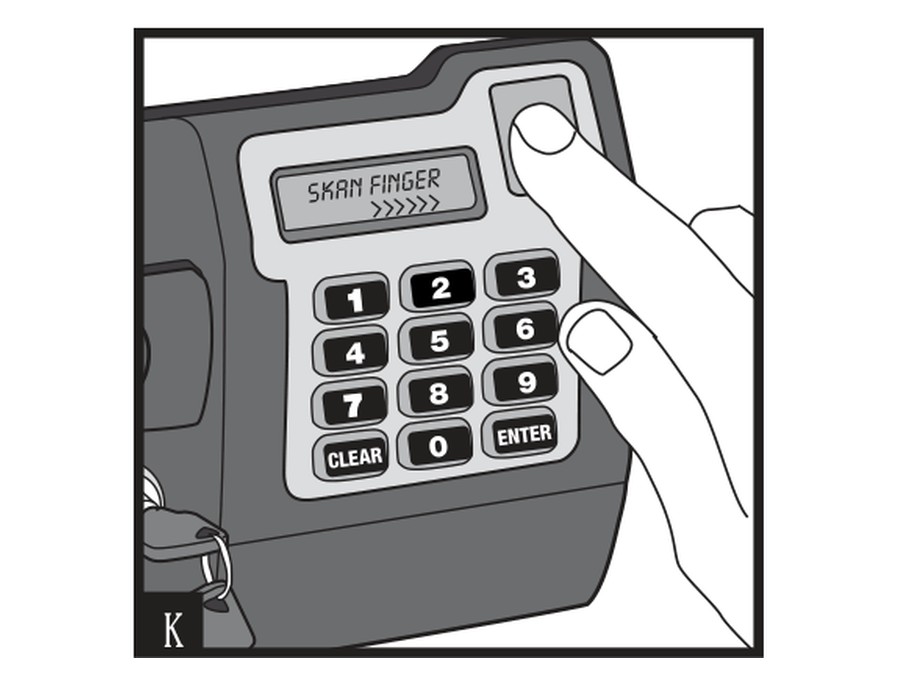
- A small LCD that reads SKAN FINGER (or other prompts), a fingerprint sensor at the top of the panel, and keys 1 to 9, CLEAR, 0 and ENTER.
- A key lock sits to the side. The key must be in the unlocked position for the fingerprint lock to work.
- It is in Sentry’s older fire-safe manual (part 513023, 2008), which covers the A3150 to A5889 and 1210 to 1570 models. It is only on some of them.
- It runs on four AA alkaline batteries (6 volts) behind a cover directly below the keypad.
How to open it
- Turn the key to the right to unlock the key lock.
- Press ENTER and place your finger on the sensor, or enter your personal code and press ENTER. The LCD then tells you the next steps.
- Turn the handle down to open the door. The handle must be all the way up (horizontal) before you try to open the safe.
- Clean the sensor from time to time with a lint-free cloth for best reading.
- Cold: the electronics may not work or may react slowly at 50°F or less. Make sure the safe is at room temperature before you program or use it.
- After you close the door, put the key back in the locked position, take it out, and keep it somewhere safe (not in the safe).
- First time use: some models are shipped with a lock-out screw in the back of the door. Take it out and throw it away. You may need to push the bolt button so the bolts lock while the door is open.
How to change the battery
The lock uses four AA alkaline batteries (6 volts) (we recommend Procell). Non-alkaline and rechargeable batteries are not recommended. When the batteries get low, the message “Batteries Low Replace Soon” shows each time you use the lock. No codes are erased when the old batteries are removed.
- The battery compartment is directly beneath the keypad.
- Put a small coin in the slot on the left side of the compartment cover.
- Twist the coin to pop the cover loose, then slide the cover to the right.
- Put in four new batteries as shown, and slide the cover back into place.
How to enroll and delete users
Open the safe first, then test with the door open.
The key lock must be in the unlocked position. The LCD guides you through each step, and the factory code is printed on the front of your owner’s manual (we are not printing it here).
First time: set your personal code
- Press ENTER.
- Enter the 5-digit factory code from the front of your owner’s manual.
- Press ENTER. The LCD tells you the next steps.
- Enter your new personal code (4 to 8 digits), then press ENTER.
- Enter it again and press ENTER. Then go on to the fingerprint scans.
Store a fingerprint
- Place a finger on the sensor and follow the prompts on the LCD. Three accurate reads are needed.
- To store a second fingerprint for the same user, press 2 and repeat with a different finger (preferably from the other hand).
Enroll or delete a user
- Enter your personal code (or the manager’s fingerprint scan) and press ENTER.
- Enter a user number (1 to 6) and follow the prompts on the screen.
- The lock stores one manager and up to six users. Sentry encourages the manager and every user to program two fingers, one from each hand.
- If you skip the fingerprint at first use, you can add it later. The original factory code is needed to continue at that later date.
- Tips: do not choose a finger with a cut or scar or very long fingernails. Choose a finger with the tightest swirl pattern. Place the finger directly (do not slide or roll it), do not move it until the lights around the sensor go off, use medium pressure, and use the same position every time. Wash dirty hands, and moisturize very dry skin (rub it in well and wipe off any excess).
- Sentry’s manual also has a way to return the memory to its original state. It permanently erases all codes and fingerprints, so we are not printing it here: call us.
Messages
| What you see | What it means |
|---|---|
| SKAN FINGER | The lock is waiting for a finger on the sensor. |
| Batteries Low Replace Soon | The four AA batteries are getting weak. Replace them. |
Wrong codes
Sentry’s older manual says the lock goes into a two-minute delay mode after three wrong codes in a row. In this mode the lock cannot be used and any key entry gives an ERROR signal.
If it still won’t open
The lock does nothing
Check that the key lock is in the unlocked position, and replace the four AA batteries (the compartment is under the keypad). If the safe is cold, let it warm up to room temperature.
The fingerprint is not read
Clean the sensor with a lint-free cloth and your finger, place it directly and in the same spot every time, and use medium pressure. Or use your personal code.
I forgot my personal code
Please do not keep guessing. Call us.
Download the full manufacturer instructions
This page is a quick-reference summary. For every feature and diagram, use the official manual for your model:
- SentrySafe Fire-Safe owner’s manual 513023 (older models, 2008)Sentry’s manual for the A3150 to A5889 and 1210 to 1570 fire safes, with the fingerprint lock on page 3. Linked from SentrySafe.com’s Product Manuals page.
- SentrySafe Product Manuals (find your model)Type in your model number to get your own manual.
Need a hand?
Still stuck? We can help.
Having a hard time getting into your safe? Our technicians are trained to open malfunctioning safes professionally, so your valuables can still be safely secured. Call us or stop by.
Steve’s Lock, Safe and Alarm · 3401 N. Sepulveda Blvd, Manhattan Beach, CA 90266
More lock guides
About this guide. This is an independent guide from Steve’s Lock, Safe and Alarm, a safe and lock dealer. Brand and model names belong to their owners and are used only to help you identify your lock. We are not affiliated with the manufacturers. These steps summarize the manufacturers’ own instructions; your lock may be a different version, so if anything here does not match what your lock does, follow your manual or call us. Always change codes with the safe door open, and test the new code several times before you close the door.
Steps last checked against the manufacturer documents on October 19, 2026.