
Safe lock help · AMSEC
Safe lock troubleshooting › AMSEC › SafeWizard / SafeWizard II access control
The AMSEC SafeWizard and SafeWizard II are access control systems for retail and cash-handling safes. The controller has a blue panel, a text screen, four grey soft keys under the screen, a number keypad with MENU, YES/NO, QUIT and ENTER/SAVE keys, and a round reader port for an electronic key. This guide covers how to log in, open a door (including a time delay), change your PIN, add and delete users, and what a lockout and the power messages mean.
Want the whole manual? Jump to the manufacturer download links.
Is this your lock?
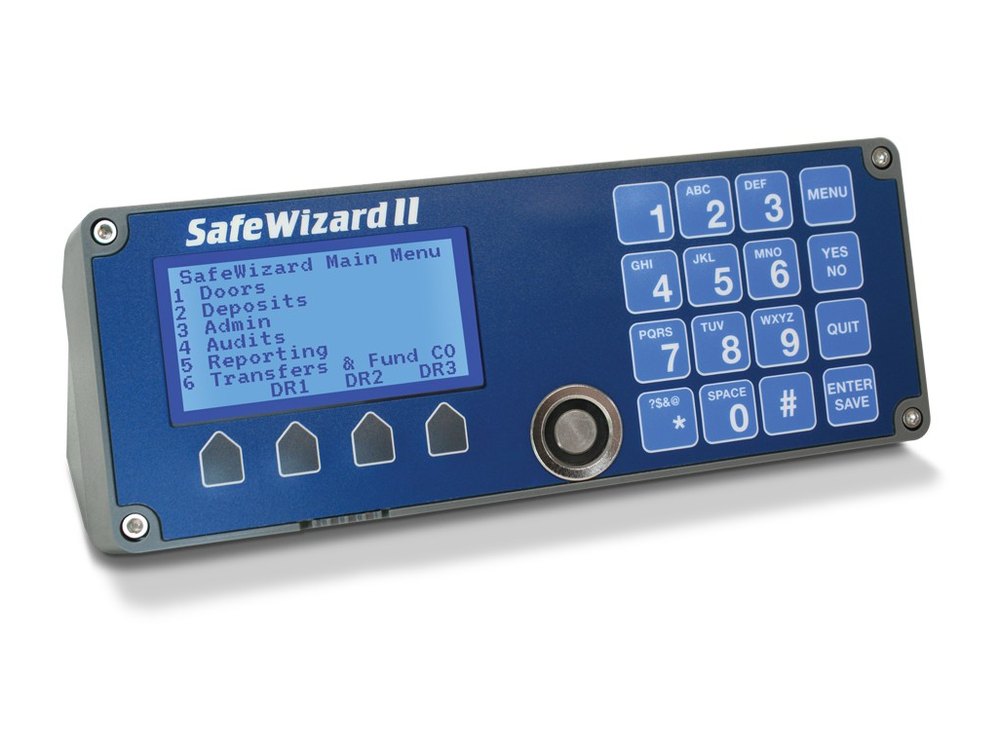
- A controller on or near the safe with a text screen that shows the SafeWizard Main Menu (Doors, Deposits, Admin, Audits, Reporting, Transfers) and soft keys such as DR1 DR2 DR3 under the screen.
- Users sign in with a PIN, an electronic key held to the reader port, or both. A PIN-only user enters a 2-digit user ID plus a 6-digit PIN.
- The system can handle several doors (an inner door behind an outer door), time delay, time lock, dual control and an audit trail. It was made for retail and cash safes.
- It is a different product from the ESL10 and ESL15 keypad locks. If your safe has a small round keypad with no screen, see the ESL10 or ESL15 guides.
How to log in and open a door
- Make sure the controller is on. The on/off switch is on the controller: slide it left for ON and right for OFF.
- Log in. PIN-only user: enter your 2-digit user ID and then your 6-digit PIN and press ENTER/SAVE. Key user: hold your key to the reader port and then enter your 6-digit PIN.
- At the Main Menu, press the grey soft key under the door you want (for example Open Door 1). Or press 1 for Doors, enter the door number and press ENTER.
- If you are allowed to open that door, the lock opens and the Door Open screen shows. Open the door.
If the door has a time delay
- Log in and pick the door as above. The screen shows “Door Time Delayed” with a counter.
- Wait for the counter to reach the preset time. The lock beeps and the screen shows “Time Delay Complete, Login to Enter” with a countdown.
- Log in again before the countdown ends and open the door. If it runs out, the safe goes back to locked and you must log in and wait through the delay again.
Opening an inner door
- If door 2 sits behind door 1, enter 2 at the Doors menu. The SafeWizard unlocks door 1 and then door 2 for you.
- Some menu items are restricted by user level. If you see “Insufficient Access Rights,” your user is not allowed to do that. Ask your manager.
- Press MENU at any time to go back to the Main Menu.
- Language: from the locked screen press Menu, then the LANG soft key. You can pick English, Spanish, French or German.
Power and battery messages
The system has a power supply module (PSM) that runs from AC power with a battery backup. The locked screen shows the AC on/off status and the battery percentage. When the safe is running on battery, the screen back light is dim, and any key press makes it bright again. AMSEC’s product page says the battery backup gives 8 hours of power-out operation.
- If the screen is dim, check that the AC power is connected and on.
- Check the battery percentage on the locked screen.
- If the controller is completely dark, check the on/off switch on the controller (left is ON).
- The manual does not give a customer procedure for replacing the backup battery. That is a service job: call us.
- The Help menus show the safe serial number, the controller firmware version and the boards that are connected. Have those ready when you call for service.
PIN and users
The first login asks you to change your PIN.
The system comes with a starting PIN for each new user, and it prompts you to change it the first time you log in. Enter the starting PIN given to you (we do not print it here), press ENTER/SAVE, then enter your new 6-digit PIN and confirm it by entering the same 6 digits again.
Change your own PIN
- Log in. Press 3 for Admin.
- Press 5 for Change Your Pin. Enter your old 6-digit PIN and press ENTER.
- Enter your new 6-digit PIN, then enter the same 6 digits again to confirm and press ENTER.
- The screen goes back to the menu and your PIN is changed.
Add a user (manager only)
- Log in. Press 3 for Admin, then 1 for User Management, then 1 for Add New User.
- Pick the validation mode: PIN only, Key only or Key and PIN. For a PIN-only user, note the 2-digit user ID, because it is needed with the PIN. For a key user, hold the key to the reader.
- Enter the user’s name (use the number keys like a phone) and press ENTER.
- Pick a user profile (for example Cashier or Manager), set any door permissions such as Open Safe Doors and Authorize Time Delay Bypass, then press ENTER to save and again to confirm.
Delete a user (manager only)
- Log in. Press 3 for Admin, then 1 for User Management, then 3 for Delete User.
- Pick the user by the list number shown on the screen. The user ID is next to the list number. Use the < and > soft keys to see more users.
- Press the YES soft key to delete the user. A confirmation appears.
- A manager can also reset a user’s PIN on the user’s screen, and an administrator can set a PIN life so users must change their PIN after a number of days.
- Adding, deleting and editing users needs a high enough user level. Everyone else sees “Insufficient Access Rights.”
Messages
| What you see | What it means |
|---|---|
| Insufficient Access Rights | Your user level is not allowed to use that menu item. |
| Door Time Delayed (counter) | The system is waiting out the time delay before the lock can open. The lock beeps when the delay is done. |
| Time Delay Complete / Login to Enter (countdown) | The delay is over. Log in again before the countdown ends to open the door. |
| Dim screen back light | The system is running on battery power. |
| Locked Out | Too many wrong PINs were entered. See below. |
Wrong PINs
The penalty lockout stops someone from trying PINs. The manual shows the default as 4 wrong tries and a 5-minute lockout, and an administrator can change both (1 to 99). If you are locked out, wait it out or ask your manager.
If it still won’t open
The screen is dark
Check that the controller on/off switch is slid to the left (ON) and that the AC power is on. If it is still dark, call us.
I forgot my PIN
A manager with the right user level can reset your PIN on your user screen. If nobody on site can, call us.
My key is not read
Hold the key flat to the round reader port, then enter your PIN. If it still fails, ask your manager to check that the key is still assigned to you. A manager can assign a key to another user.
The door will not open and I waited
Check whether the door has a time delay. After the delay you must log in again before the countdown ends. If the countdown ended, start over.
Download the full manufacturer instructions
This page is a quick-reference summary. For every feature and diagram, use the official manual for your model:
- AMSEC SafeWizard II Quick Reference (PDF)Part 4305378, revised 06/17. Hosted by AMSEC.
- AMSEC SafeWizard Access Control System Operating Instructions (PDF)Document 4305325, revised January 29, 2016. Hosted by AMSEC.
- AMSEC SafeWizard II product pageFeatures list, including the 8-hour battery backup.
Need a hand?
Still stuck? We can help.
Having a hard time getting into your safe? Our technicians are trained to open malfunctioning safes professionally, so your valuables can still be safely secured. Call us or stop by.
Steve’s Lock, Safe and Alarm · 3401 N. Sepulveda Blvd, Manhattan Beach, CA 90266
More lock guides
About this guide. This is an independent guide from Steve’s Lock, Safe and Alarm, a safe and lock dealer. Brand and model names belong to their owners and are used only to help you identify your lock. We are not affiliated with the manufacturers. These steps summarize the manufacturers’ own instructions; your lock may be a different version, so if anything here does not match what your lock does, follow your manual or call us. Always change codes with the safe door open, and test the new code several times before you close the door.
Steps last checked against the manufacturer documents on October 19, 2026.